Thursday, May 31, 2012

Radish Leaf Pesto

To prove the authenticity of this "vegan country kitchen" blog, my hot gardener brought me these home-grown radishes the other night. Actually, he happens to be my hot hubbie and these radishes are from our gorgeous little country garden. 

While washing the radishes, he mulled that "there must be something we can do with all these radish leaves". This was our first official home garden product, and it seemed a horrifically sad waste to chalk half of it up to being trash. 

While I'm rather adverse to using recipes, I had to admit I was at a loss for how to use these slightly prickly and quite bitter large leaves. I cheated, and visited the Chocolate & Zucchini website and found a killer creative pesto recipe for these babies. 

Drop a couple handfuls of radish leaves (no stems) into your food processor, along with some vegan parmesan cheese (or even any other white vegan cheese). Add a handful or two of cashews or almonds, and a clove or two of fresh garlic. Pour in an ounce or so of lemon juice, and about 3 tablespoons of olive oil. Sprinkle in a rather generous amount of salt and grind in a bunch of black pepper. Pulse in your food processor for a while, turning off to stir as needed. Taste test along the way and add in ingredients as needed. If it's too thick, add extra oil. Serve with several varieties of your favorite crackers! Keeps in the fridge for half a week. 

Country "Sushi"

So this is actually simply a cleverly designed and sliced wrap. 

- Start with your favorite large-sized wrap. I used a spinach wrap. Lay it flat on a plate. 

- Spread vegan cream cheese on the top 2/3 of the wrap. This will be your "stuffing" area. 

- Lay about three slices of faux deli meat (I like oven roasted Tofurky slices) on top of the cream cheese. 

- Next, layer on several large slices of avocado, and then tomato, and then vegan cheese slices. Try to make all "stuffings" cover the cream cheese foundation.

- Finally, place a few spinach leaves on top. Grind on fresh black pepper and sea salt. 

- Start rolling! This is the tricky part. Start rolling on the stuffing side. The "naked" side is rolled up last. Your roll will be pretty fat, so don't freak out. Notice in my picture that my rolls are big, and not completely stuck together. They may look perfect, but I arranged them so that they'd look nice. :) Roll tightly, but not so much that the wrap busts open. 

- After you have the roll, carefully slice into about 1" pieces. I started my slices in the middle of the roll, rather than the ends (so as not to push out the stuffings).

- The pieces wont hold together perfectly, but feel free to eat them with chopsticks if you're a sushi expert! I did, and had a blast. :)

- For my side, I served a can of black olives and created a simple dip: 2 parts vegan mayo to 1 part Grey Poupon (original deli style mustard). 

Wednesday, May 30, 2012

Parmesan Encrusted Tuscan Tofu

I was feeling especially creative tonight. In the foreground, we ate boiled bi-color corn on the cob with pink Himalayan salt and light Smart Balance. I also served my Iron Skillet Mediterranean Veggies (with the corn) and my famous Summer Chop Salad (on the left). 

But the highlight of the meal was my new and now signature (vegan) Parmesan Encrusted Tuscan Tofu. 

- Start with a block of extra firm tofu. Drain and press out the excess water. Slice into very thin squares. 

- Lightly oil an iron skillet (or frying pan) and drop in a couple cloves of minced garlic, and half a sweet onion (also minced) if desired. Let that sauté for a couple minutes. 

- Place each tofu square into the skillet individually (with the garlic and onion still in there), so each is laying flat. Sprinkle the tofu - while in the pan - generously with pink Himalayan salt, Tuscan (or Italian) seasoning, and vegan parmesan cheese.

- Allow it to sauté for about 5-7 minutes, until brown on the bottom. When brown, flip the squares over. Repeat the seasoning again, on the other side of the tofu that is now facing up. 

- Allow it to sauté again for about 5 minutes. When this other side is brown, flip over for a third and final time, to allow the newly seasoned side to brown with the cheese and seasonings. 

- If desired, after serving, sprinkle additional vegan parmesan and fresh cracked salt to bring out the full flavor. 

- Serve with a side of original Grey Poupon for dipping.

Flourless Peanut Butter Cookies

My husband and best friend both swear these are their favorite peanut butter cookies. And lucky for you, they're one of the simplest things I make, though, I can't really take credit for this recipe. Various versions of it are floating around the internet, I've just added a couple things to make it all the more delicious. 

You'll need: one cup of your favorite peanut butter (smooth or crunchy), one to one and a half cups of your favorite sweetener (I like Sugar in the Raw or Stevia), and egg replacer equaling one egg. Mix it all up, and spoon the now cookie batter onto a non-stick baking sheet. It's your choice whether you make the cookies small and thick, or big and thin. Bake at 350 degrees for about 8-10 minutes, until the cookies just start to brown. 

If you'd like, you can add some dark chocolate squares to each cookie for an antioxidant boost. And a walk down  peanut butter cup memory lane! 

Sunny Power Salad

This is one of my favorite quick salads. It's loaded with protein, fiber, and just the right amount of fat. A great lunch option for a busy day, and will keep you full so you're not searching for a mid-afternoon snack.

Grab a few handfuls of fresh organic spinach and after washing, throw in a large salad bowl. Cube up half a block of extra firm tofu and drop that in next. Tear up a couple slices of vegan cheese slices and layer on top of the tofu. Sprinkle on roasted sunflower seeds. Drizzle on a bit of your favorite light dressing. 

Seven-Layer Taco Cups

Kudos to one of my best friends, for dropping this yummy idea into our laps on a recent visit to their South Carolina home. 

- Find a muffin pan. Press either filo dough or wonton wrappers into each muffin slot. 

- Prep either faux ground beef or extra firm tofu. If tofu, cut into teeny tiny cubes and season with low sodium taco seasoning. If faux ground beef, brown in a frying pan, also with taco seasoning. 

- Plop whatever meat substitute you chose into the bottom of each wonton or filo dough muffin section. 

- Top each with vegan shredded cheese. 

- Bake at about 375 degrees for around 10-12 minutes. 

- On the side, prep fresh pico with chopped tomato, onion, cilantro, lime juice and salt. 

- Also optionally prep fresh guacamole with the same ingredients for pico, plus avocado.

- Once the taco cups are through baking, top each with guacamole, pico, and a dollop of vegan sour cream. Add a whole black olive to the top of each if you'd like. 

Seitan Stir-Fry with White Sauce

The first time I tried seitan, I'd been vegan for about half a year and freaked out, thinking that Whole Foods seriously screwed up when they told me I was buying mock chicken salad. I spit the bite into a napkin and read the ingredient label, only to find Whole Foods indeed was not a no-good, low-down, lying scumbag of a company. In fact, they introduced me to this mysterious seitan (not to be confused with Heaven's arch-nemesis), which actually is simply wheat gluten, prepared in a fancy manner to cook, taste and look just like chicken or beef.  

For this stir-fry, I broke up a package of seitan and threw into a wok. But... DON'T THROW OUT THE SEITAN WATER!!! We'll use it later. Let the seitan fry in the wok (with or without a bit of oil or water to keep it moist). While the seitan is in the wok, cut up and toss in a bunch of asparagus and a head or so of broccoli. Stir it. Fry it. Let it sit there for up to 10 minutes.

While that's cooking, pour the seitan water into a microwavable container. Stir in 2-4 teaspoons of cornstarch. Microwave for about 2 minutes. This mixture will turn into the white sauce gravy. If it's not thick enough, add in another teaspoon or two of cornstarch and microwave again. Once you've reached a thin gravy consistency, pour it into the wok with the seitan and veggies. Stir-fry it all for another few minutes to allow the flavor to soak into the seitan and veggies, and the excess liquid to steam off. Serve alone, or over your rice of choice. 

Shake n' Bake Tofu

I missed my days of victorious one-toothed grins on TV ads, proclaiming "It's Shake n' Bake and I helped!!!" Okay, that wasn't really me. But I strove to be that kid at one point in my life.

As a vegan, I searched for something to Shake n' Bake. Duh, you can do anything with tofu. Like the nasty dead animal parts I used to use, I tossed cubed (big or small, your choice) extra firm tofu into a ziplock bag with the Shake n' Bake mix, a handful of tofu at a time... AFTER dunking the tofu in almond milk (which makes the mix stick to the tofu). Carefully lay out all the coated tofu cubes onto a non-stick baking pan. Bake at about 425 degrees for around 10-15 minutes, until a warm brown color. 

I served with a bowl of generic brand beef stroganoff mix (sans the beef) and baked baby asparagus spears (dusted with olive oil, sea salt and pepper before baking for about 5-8 minutes). 

Sautéed Summer Veggies & Portobello Sandwich

I had the BEST portobello mushroom hoagie at  Mellow Mushroom in Hickory. I immediately dragged my husband to the grocery store and purchased a ton of gloriously huge portobellos.   As an elementary school kid, I was the oddball geeklet who ordered mushrooms and olives on my pizza. All the cool 8-year-olds thought I was gross. Yeah, laugh it up after all that cholesterol, fat, and slimy rotten meat you guys used to slather on your nasty pizzas. I'm veggie and I know it. :) 

So for this incredibly delicious adult meal, I found vegan potato buns. Add a couple thick slices of avocado, some iceberg lettuce, and raw onion. Toss the portobello cap (or slices) into a lightly oiled skillet and pan fry for a few minutes until well-browned. Sprinkle a bit of sea or pink Himalayan salt on the portobello if desired, and layer into the sandwich.

For the beautiful side dish, slice up three or four (preferably local) squashes, three zucchinis, a vidalia onion, and more portobello mushrooms. Season with the salt and a bit of oil after dumping into a skillet or wok. Pour a little water in while lightly sautéing if the veggies appear to be drying out. Sauté (or stir-fry) lightly, until everything is minimally browned, but still rather crunchy. The color and crunch denote the presence of vitamins and minerals! 

Diet A&W root beer optional. Mandatory for those of us addicted to it. ;)

Cauliflower Popcorn

I'm just a tad iPad-obsessed, and as a holistic nutrition consultant, I'm always monitoring the app store for new wellness apps. My favorite is Superfood HD, which focuses on simple snack ideas for whole foods, and incorporates an incredible amount of nutrition info for each fruit and veggie. 

My favorite little snack of the moment is cauliflower "popcorn". Grab an entire head of cauliflower. Wash it and cut it up into little florets. Toss it all into a good quality ziplock bag. Trust me... not a cheapo generic brand. I tried that once and POOF!!!!! Cauliflower on my hardwood floor and four happy dogs getting a great dose of vitamins and fiber. Anyhow, with the cauliflower, dump in about three tablespoons of nutritional yeast and grind in some fresh sea salt, along with an optional dash or two of cayenne pepper. Shake shake shake your bootie (and your ziplock bag). Taste test to make sure it doesn't need more salt. Also experiment with some fresh grated pepper. Pour into a popcorn bowl, pop in a movie, and enjoy know ing you're loading up on fiber instead of fat. As a huge popcorn lover, I had to admit that I prefer this to popcorn! Leftovers keep in the fridge for up to a week.

Fancy-Shmancy Grilled Cheese

This creation is credited to my hubbie. He taught me how to make the unbelievably scrumptious grilled cheese sandwich his dad made for him as a kid. When I'm particularly stressed by graduate school work, he makes this to warm my heart and tummy. 

We buy fresh sourdough bread, or sometimes make a loaf of sweet country bread in our breadmaker machine. But for grilled cheese, I find tangy sourdough to be the yummiest. Drop some Light Smart Balance or other non-dairy butter substitute onto an iron skillet (preferably) or frying pan. Take two pieces of bread. On one, spread a bit of vegan mayo. On the other, place some vegan cheese of your choice. You don't need tons of cheese, because the mayo adds a lot of depth to the sandwich. Place the two slices of bread in the skillet and allow them to pan fry, mayo and cheese sides up, of course. Check the bread every minute or so until you reach the brown color you're looking for (I prefer mine just lightly browned so as to retain the bread's full flavor). If desired, add a fresh slice of tomato before smushing the sandwich together! A true country version of the grilled cheese sandwich. 

Good Ole' Root Beer Float

Those who have known me for more than 24 hours may notice a can of Diet A&W root beer is one of my permanent accessories. When I wake up in the morning. When I eat lunch. When I'm in class. When I'm in the car. When I make dinner. When I eat dinner. When I'm working. When I shop. When I visit my family's house. When I go to bed. While I'm a certified holistic nutrition consultant, I have allowed myself one real edible vice. I drink about 4-5 cans of Diet A&W daily. Please don't lecture me about artificial sweeteners... not only do I know about them, I professionally studied them. I may not be blissfully ignorant, but I'm blissful with my daily liter of frothiness. 

Perhaps the simplest "recipe" on my blog: the root beer float! Plunk about three scoops of vegan vanilla ice cream into a chilled beer mug. Pour in a can of root beer, and enjoy, knowing no dairy cows had to suffer for your guilty little pleasure. 

Iron Skillet Mediterranean Veggies

We invested in an iron skillet not too long ago, after making friends with a local rather famous chef who swears by iron skillets. David researched online how to properly "season" the skillet before using it (a 2+ hour process, but well worth it). Basically, it needs to be oiled and baked for a while so that it will be a naturally non-stick piece of cookware. I refuse to cook with any other pan now except our iron skillet, with the exception of the occasional wok dish. My tofu stays in tact, my food browns evenly, and I can cook on what used to be dangerously high heat! 

For these Mediterranean-style vegetables, I found local squash and zucchini. I sliced these up, along with an eggplant, onion, and a couple giant portobello mushroom caps. Put a bit of oil in the skillet and toss in the chunks of eggplant. Eggplant apparently needs to be cooked for some time to soften it... take my word for it. I tried to lightly sauté it initially, and ended up eating rubber, not figuratively. So, sauté the eggplant by itself for a while on rather high heat, until it begins to soften and brown and turn mushy. Then, toss in some onion and the zucchini, squash, and portobello. Continue browning, turning and mixing. It will be almost done when the zucchini and squash are softer on the inside, but their "skins" are still pretty firm (Don't overcook! Retain the vitamins!)  At this point, toss in some chunks of tomato and a couple big handfuls of olives (I am in love with canned black olives, but use your own favorite). Save the tomatoes and olives until the end so as not to overcook them and keep their nice texture. They'll last fine in the skillet for 2-5 minutes. 

Dump it all into a big mixing bowl when done. Pour a little olive oil over all of it, and sprinkle fresh pink Himalayan salt, Tuscan seasoning, and some vegan parmesan. As with all of my "recipes", everything is approximate, to taste, and to your personal liking. Feel free to tweak. This dish will keep for a good three or four days in the fridge and makes for a great leftover (don't microwave... pan fry it again when re-serving to keep it crisp). 

Baked Peanut Butter Tofu

I heart peanut butter. But as Mary Tyler Moore's Rhoda would say, I may as well apply it directly to my hips. 

So, I try to make it healthy when I do use it. For this easy entree, drain, press, and slice a block of extra firm organic tofu into about half-inch thick squares. Spread your favorite peanut butter (mine is any by Peanut Butter & Co.) on the bottom of a square casserole dish. Place the tofu slices on top of the peanut butter. Then spread more peanut butter on top of the tofu, and around the sides as much as possible. Sprinkle a few peanuts on top. Bake at about 375 degrees for around 15 minutes, or until it all starts browning a bit. 

Feel free to drizzle on a bit of agave or maple syrup to after serving, if you prefer a sweeter dish, or sprinkle on some pink Himalayan sea salt for saltier. 

Monday, March 5, 2012

Thai Tofu Spinach Soup

My husband and I started a weekly date night tradition when we started dating almost six years ago. We felt it important to keep our relationship fun and fresh by continuing to "date" each other, now almost six years into our marriage. Since moving to the country, we frequently spend our date nights in Hickory, about 25 minutes from our cabin. Last week, we tried out a new Thai restaurant. I had been feeling a bit dehydrated that evening, so David recommended I start out with a light soup. We both ordered a small spinach tofu soup in a clear garlic broth and were pleasantly surprised at the simple and healthy concoction. I decided a couple nights later to make my own version, as a small bowl at the restaurant runs almost $3.00. I was able to make a giant pot (holding at least a dozen of those small bowl servings) of it for less than $5.00. I've never made this before, and this is only my second time making soup, but this soup seemed easy enough to figure out without digging up someone else's, since I knew what the restaurant's recipe tasted like.

Start with a big chili pot. Fill it about 1/3 of the way with water. The amount of water really doesn't matter. You can add more later. I'm guessing there were 10-12 cups in my chili pot, but as I've said before, I refuse to measure things. Boil the water on high heat. While the water is boiling, cut up a block of tofu into small cubes, about 1/2" squares. Dump the tofu cubes into the boiling water, and reduce heat to medium. Dice 1 - 2 sweet onions and 6 cloves of garlic. Dump those in with the tofu. Sprinkle in either regular sea salt or garlic salt, and fresh ground pepper to taste. Pour in some oil. I used Sesame oil for a bit of added Asian flavor. Not too much oil... just enough to get the water a little oily. The water will start to look shinier and shinier as you pour in more oil. Open a full bag of fresh spinach. After washing all of it, drop it in at the very end of cooking. The longer you leave it in, the softer it will become. I left it in for a couple minutes and it was relatively soggy (easier to scoop into your soup spoon). Turn off the heat and serve. Leftovers should keep for 1-2 days. Don't feel the need to slurp down all of the broth... it contains a good bit of sodium and some fatty oil. I ate my soup with the broth, and then dumped out any excess broth remaining in my bowl. This soup is LOADED with protein, fiber, and Iron. A great low-calorie health booster. 

Sunday, February 19, 2012

Peas Pass the Confetti Salad

Pretty much any dice-it-all-and-toss-it-all-in-a-bowl salad is a confetti "salad". Here's one I made tonight. Dice one sweet onion and one can of black olives. Throw in a large mixing bowl. Open two cans of no salt added sweet peas and toss those in as well. Add one bag of vegan cheese (I prefer some with orange "cheese" for color). Toss in a tablespoon or so of minced garlic. Spoon in some vegan mayo (about five heaping tablespoons). Pour in a little oil (I used sunflower). Add about ten capfuls of white vinegar (creates the mayo tang without adding so much mayo). Sprinkle in some bacon bits (most, if not all, are vegan). Grind lots of fresh pepper and seasoning salt to taste.  Serves about eight as a side dish, and keeps well for leftovers. 

Wednesday, February 15, 2012

It'll Make You Scream

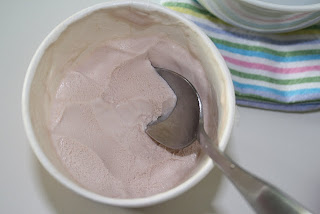
Let me be quite clear... this is not a product-posting blog. This is a vegan country cooking blog. That said, since going vegan, I've been remiss to find ice cream that tastes like real ice cream from my animal-eating days. And I promised myself that if I ever found real vegan country ice cream, that I'd scream it to the world. I FINALLY found it, after three and a half years of searching and taste-testing. The closest I'd found thus far were Almond Dream and hemp milk ice creams, both lacking the traditional creaminess. Seems you need to leave them out on the counter for at least 10 minutes to allow them to soften. Otherwise, they're frozen blocks of pureed flavored nuts and grain.

And I'll tell you, I'm an ice cream connoisseur. Growing up, my mom started a weekly Tuesday night tradition: game and ice cream night. It's one of my greatest memories as a kid (and on through college!). Each Tuesday night at 7:30, my mom, sisters, and me would choose a board or card game, sit on the den floor, and play games until about 8:30, at which point, the main event happened... My mom would go into the kitchen and scoop humongous bowls of ice cream for each of us to devour until 9:00. The bar for ice cream quality was henceforth set impossibly high. 

There's not been much I've missed as a vegan. I don't miss wearing animal skins as fashion statements. I don't miss animal carcasses served as entrees on my plate. I don't really miss the fatty textures of cheese or butter. I don't miss the farm-y taste of another species' milk. And I certainly don't miss eggs... the bane of my existence, as I'm impossibly allergic. 

But I have missed a good bowl of ice cream for old time's sake. So when I stumbled upon Trader Joe's strawberry coconut milk ice cream I was hopeful... though skeptical, as I HATE HATE HATE coconut, and have not been able to stomach the taste of coconut milk ice creams. Too tropical, too heavy. So I bought one and once home, gingerly tasted it, hopeful that I hadn't wasted another $4 on fake (hard, crumbly, weird) ice cream. 

I'd pay $10 for this stuff. No coconut flavor at all. This stuff tastes like old fashioned, country, homemade, rich ice cream BURSTING with strawberry flavor. Even my husband who passionately hates coconut was instantly addicted to this stuff. Not one hint of coconut flavor. We both just kept sitting there at the kitchen table, mumbling like idiots, "It's sooooooooo creamy........" and stuffing our faces. 

I read that this comes also in chocolate, however none of our local Trader Joe's seem to carry the chocolate yet. For now, I'm in love with strawberry. For part of my Valentine's Day gift yesterday, my husband surprised me with six containers of this stuff! Living out in the country, we're about an hour from the nearest Trader Joe's, so he made the journey to hold me over for a few weeks. I'd been saving about a quarter inch's worth in the carton for weeks, terrified that I'd not be able to get more... until David showed up with an armful to ease my heart! 

Tuesday, February 14, 2012

Chop Salad, No Soggy Lettuce

This is my go-to recipe for our own quick dinners or dinner parties. I don't really have a name for it. I just refer to it as my "tomato and salad". First, salad doesn't need greens to be a salad, so toss those to the side. Admit it, they sometimes get in the way of the good stuff. Chop approximately:

1 avocado
1/2 sweet onion
2-3 tomatos
2 seedless cucumbers
1/3 bunch fresh cilantro
1-2 fresh garlic cloves

Pour some olive oil and a bit of balsamic vinegar (or lime juice) over the veggies. Sprinkle some sea salt and grind some fresh black pepper. Stir it all up. Toss in a bit of vegan cheese if desired, or sprinkle a tablespoon or so of nutritional yeast. Don't plan on leftovers. The avocado doesn't tend to last long and the vinegar or citric juice cooks the tomatoes. Prepare fresh, serve promptly. Serves 2-4 people, depending on whether you're using this as an entree or side dish.

Thursday, February 9, 2012

Orange Creamsicle Cupcakes


Another oldie from our city life... the last one I documented with my iPad. We had our best "couple's friends", Michele and Gator, over a after the New Year. I asked Michele if she had any meal requests at our cabin. She requested one thing: my gourmet cupcakes. I had to laugh, because out of all of my creations, these are the least gourmet, the least creative, the least unique. But I sure know how to put on a good facade. These suckers will make anyone think you dropped $50 and were covered in various ingredients for hours on end. 


So these cupcakes are compliments of a Betty Crocker box of orange cake mix and tub of vanilla icing (I can't remember if Betty Crocker or Duncan Heinz frosting is vegan... but one or both is, just check for "milk" in the ingredients). After baking the cupcake mix, I plopped two tubs worth of vanilla frosting into a huge ziploc bag, and cut a rather huge hole in the corner of the bag to create a makeshift frosting squeezing bag. Not necessary, but makes the frosting look a heck of a lot prettier on the cupcake. After coating the cupcakes with frosting, drizzle with (optional) Hershey's chocolate syrup. Sprinkle on some chunky all-natural cane sugar, and these babies look expensive. They actually only cost about $5 to make two dozen, once all is said and done.

It Doesn't Really Make Me Sneeze

Of course if it had any real cheese in it, this dish probably would make a lot of people sneeze. Most of us know by now that dairy products cause congestion. I used to be a Kraft mac and cheese addict... and I also used to be addicted to Afrin. 

But my mac and "cheese" is sneeze-free. I make this several times a month, and the included picture is admittedly not from a recent cooking adventure, but rather from when we lived in Lake Norman. However, this recipe stands the test of time, migrating from city to country life.  

I buy Road's End Organics dairy-free shells and chreeze from Healthy Home Market in Davidson. I just don't follow the instructions on the box. Remember, I told everyone in a previous post that following instructions to the T is chef suicide! Instead, I cook the noodles and after they're done, I use 1/3-1/2 tub of vegan cream cheese, chop it up a bit, and dump it in with the warm, drained noodles. Add some almond milk and stir. Once the cream cheese starts melting, add the powder packet included in the mac and cheese box. The powder is mainly nutritional yeast and salt, so if you want to make this without buying the boxed product, just experiment with nutritional yeast powder, salt, and spices on this step. Add a bit more almond milk to keep it all creamy. Taste, and see if you need to add any of your own spices. I often add either some garlic salt (I prefer garlic salt because it cuts back on total sodium to mix in the garlic), dill, or pepper. One box makes the large bowl pictured, and the leftovers are great the next day, warmed up in the microwave. Add some more almond milk to it before reheating to keep it moist. For this recipe, the cream cheese is the trick. Many vegans find mac and cheese recipes to be dry or tasteless. I tried adding cream cheese a year ago, and voila... it stays extremely creamy!

Sushi... Hold the Rancid Marine Life

When I tell people my favorite food is sushi, I usually get a raised eyebrow, as if I'm unaware that fish are animals. What it seems many don't know is that "sushi" doesn't contain raw fish. "Sashimi" is the nasty, rotting, depressing animal carcass crap that makes you puke in the toilet five hours later. (Seriously, I've had food poisoning twice... once from mayo and once from sashimi... what an animal product coinkidink.) 

We made vegan sushi a few weeks ago, for the first time, after envying the rainbow of homemade veg sushi my sister and her fiance created and of which they posted a photo montage to Facebook. I decided heck with paying $30 for vegan sushi at Eez Fusion in Birkdale (hands-down the best place in Charlotte-metro to get vegan sushi), I'm gonna try it on my own. 

I'll say David didn't enjoy the adventure as much as I did. His sushi rolls weren't wrapping tightly, and began busting open like piñatas at the slightest movement. Realizing that it's best to learn from other people's mistakes, I rolled up my sushi rolls so tightly that I'm sure the cucumbers were gasping for air. 

Start with white or brown sushi rice. Must be sushi rice (STICKY!!!), or else your rolls will fall apart like confetti. Cook the rice, wet seaweed sheets (nori). Take a damp nori sheet, wet your fingers, pick up some cooked rice, and spread it over the nori. Wetting your fingers helps with the spreading, as the rice is like glue. After the nori is coated, start filling with strips of various vegetables. We used: tofu, vegan cream cheese, avocado, red onion, sweet pickles, cucumber, squash, jalapeño, fried crispy onions. Then, roll it all up (think "open-ended-burrito"). TIGHTLY!!! Slice carefully, into about 6-8 pieces per roll. I also made a vegan spicy sauce: a couple tablespoons of earth balance vegan mayo mixed with a couple teaspoons of Trader Joe's chili sauce.

Little Bit 'o This, Little Bit o' That

So one thing people may notice on this blog is the utterly annoying lack of recipes for my food stuffs. I honestly don't use recipes. I tend to rummage through the fridge or pantry and whip up something with whatever's available. I do use cookbooks... but merely for inspiration (with the rare exception made for baking, which is much more scientific). 

If you find yourself irritated with me for want of clear ingredient lists, cooking times, I don't care. I've found that strict recipes tend to ruin a creation. Something is inevitably "missing" upon tasting. I'd rather lay out a few spoons and taste test my own concoction, and have my husband, friends, and family puzzled at exactly how that delicious flavor came about! 

Humongo Vegan Nachos


My husband's favorite thing in the world (other than me) is chips and salsa. But if he's really honest with us, it's got to be nachos. Last night, we threw a Tofurky Pizza in the oven topped with some extra Daiya vegan cheese, and thought that perhaps the pizza wasn't enough to fill our rumbling stomachs. I decided to whip up some nachos... and 15 minutes later we realized we had far too much food on the table. David admitted it was his dream meal.

For the nachos, I prefer white corn chips from Trader Joe's, or any other brand that uses simple ingredients... corn, salt, oil. Period. Sprinkle on some vegan cheese shreds (Daiya really is the best melting vegan brand) and toss in the microwave. We didn't add bean chili or black beans, but to make these even more "humongo" dump some of those on as well. Pour on salsa (opt for a fresh, even low sodium brand if possible), and top with sliced olives, diced de-seeded fresh jalepenos, chopped onion and avocado chunks. Dig in.

Wednesday, February 8, 2012

Pan Fried Cheesy Tempeh


Most animal-eaters have never heard of tempeh, a fermented soy product originating in Indonesia. Heck, half of the cruelty-free-eaters I meet haven't even tried tempeh. It's a bit of an acquired taste, a mashed-together block of soy and grain. Packed with protein and fiber (nearly your entire DV of protein and about half your DV of fiber for the entire block). I prefer the Westsoy brand, as I find it a little sweeter and it seems to retain moisture better.

I usually pan-fry my tempeh dishes. For this one, I warmed a sauteing pan, added olive oil and balsamic vinegar, and then dropped in the cubed tempeh. The balsamic vinegar keeps the tempeh moist, adds a nice punch of tart-sweetness, and gives you flavor without all the sodium. Be forewarned... the balsamic vinegar smells a little raunchy when heated, so just get over it. I promise, the 5-10 minutes of questionable aromas is not indicative of the deliciousness at the end of the rainbow. Saute until browned, at least. I like to blacken my tempeh a bit, so be prepared to cook it 10-15 minutes for that crispy, rich tempeh. Towards the end of sautéing, add a bit of garlic salt. Not too early, or you'll wind up with burnt garlic that smells worse than the balsamic vinegar. Serve the tempeh into a microwavable bowl, layering vegan cheese slices as you go. Microwave it all until the cheese melts a bit and... voila, a scrumptious bowl of protein and fiber that will keep you full all night.

Ya'll Come Back Now


Alright, I'm really not that country. My husband and I were born and raised in Charlotte, NC, and just a handful of years ago I would have laughed in your face and moseyed on my way to posh South Park mall had you told me that I'd be living an hour outside of any major city, in the middle of absolutely nowhere, surrounded by cows and chickens, not a Taco Bell in sight.

Of course, back then, I also ate and wore animals. So my priorities were a bit wacky about what "location, location, location" really means.

Since going vegan in 2007, my husband and I have really cleaned up our lifestyles. Realizing that we were each sentencing about 180 animals each year to unnecessary and horrid death for the sake of palate and fashion really was a reality check. We re-prioritized our lives as newliweds. We ditched our house in cushy Piper Glenn and lived in apartments for a couple of years, figuring out who we were and what we really loved. We certainly didn't love keeping up with the (unhealthy, nature-deprived, addicted-to-stress) Joneses. While figuring things out, I became a Certified Holistic Nutrition Consultant through American College of Healthcare Sciences, in an effort to communicate the human benefits of a vegan diet (seems some people are only convinced to do a good thing if it makes them skinnier, shinier, or sexier).

My husband and I began searching for a large, private piece of land in the country. We eventually stumbled upon a cabin in Western NC, nestled on 10 wooded acres, overlooking a rushing river scattered with boulders. No neighbors, unless you count the cows. David promptly began digging a garden and composting with a worm farm, while I became Suzy Homemaker, chopping, slicing, dicing, sauteing, seasoning and baking.

Historically, I've been rather flaky about keeping up with my blogs. However, I'm excellent about posting quick pictures on Facebook chronicling my culinary creations. After multiple requests to start instead collecting my recipes into a blog, I decided that perhaps I could keep up with this. After all, cooking doesn't demand lengthy philosophizing about ethical dilemmas in thought-provoking essays, therefore, my posts should be trim.

I should, however, here disclose that I actually am a philosopher. A graduate student, actually, at UNC Charlotte, studying Ethics and Applied Philosophy. Case-in-point, this little welcome post should have been a couple of sentences to explain that I'll be posting some of my delicious cruelty-free recipes I've created over the past several years being vegan. But instead, I've written far too much and can only thank you and apologize if you've read this far . . .